+86 18513032986


How to Use a Timer Power Plug: Complete Setup Guide
Admin 2026-06-29Content
- 1 Types of Timer Power Plugs and How Each One Works
- 2 Step-by-Step Guide: How to Use a Mechanical Timer Power Plug
- 3 Programming a Digital LCD Timer Plug: Detailed Walkthrough
- 4 Setting Up a Smart Wi-Fi Timer Plug
- 5 Timer Power Plugs in Switchgear Panels and Distribution Boards
- 6 How Timer Power Plugs Cut Energy Bills: Real Numbers
- 7 Safety Rules for Timer Power Plugs
- 8 Application Guide: Which Timer Type for Which Job
- 9 Troubleshooting Common Timer Power Plug Problems
- 10 Advanced Uses: Integrating Timer Plugs with Switchgear and Building Automation
- 11 Maintenance Schedule for Timer Power Plugs
- 12 Buying Guide: What to Look for in a Timer Power Plug
- 13 Frequently Asked Questions
A timer power plug lets you schedule when any connected device turns on or off — no manual switching needed. Plug it into a wall outlet, set the ON/OFF times on the dial or digital display, then plug your appliance into the timer's socket. That is the complete core action. Everything below expands on that foundation: how different timer types work, how to wire them safely, how they interact with switchgear panels, how to troubleshoot, and how to squeeze the most energy savings out of them.
Types of Timer Power Plugs and How Each One Works
Choosing the right timer begins with understanding what is available. The four main categories differ in precision, programming depth, and the kind of switchgear environment they suit.
Mechanical Rotary Timer
A 24-hour dial with push-in trippers set every 15 or 30 minutes. Accuracy is typically ±1–2 minutes per day. Best for lamps, fans, and simple appliances. Rated load is usually 10 A / 2,400 W at 240 V. No battery backup — loses setting during a power cut.
Digital LCD Timer
Stores 8–20 independent ON/OFF programs. A small CR2032 coin cell preserves the clock during outages. Minimum interval is commonly 1 minute; accuracy is ±1 second per day. Handles loads up to 16 A on many models.
Smart Wi-Fi Timer Plug
Controlled via smartphone app, voice assistant, or automation platform. Supports sunrise/sunset scheduling tied to GPS location, energy monitoring (some models report wattage in real time), and remote override. Typical rated current: 10–16 A. Requires a stable 2.4 GHz Wi-Fi signal.
DIN-Rail Switchgear Timer Relay
Mounted inside a switchgear distribution board. Controls high-current circuits — lighting, HVAC, pumps — directly through the panel's busbar. Weekly programs, pulse outputs, and astronomical timers are standard features. This is the industrial-grade equivalent of the plug-in timer.
Step-by-Step Guide: How to Use a Mechanical Timer Power Plug
Mechanical timers remain the most common type worldwide. Follow these steps exactly.
Check the Load Rating
Read the label on your appliance and compare it to the timer's maximum load. Never exceed 80% of the rated capacity as a continuous operating rule — a 10 A timer should not run more than 8 A continuously. Inductive loads (motors, compressors) draw 3–7× their running current at start-up, so factor that in.
Set the Clock to Current Time
Rotate the outer dial clockwise until the arrow or pointer aligns with the current time. The 24-hour clock is marked around the perimeter. On most units, 12 o'clock noon and midnight are clearly labeled. Getting this reference point correct is the single most common mistake — if the clock is wrong, every scheduled event will fire at the wrong time.
Push In or Pull Out the Trippers
Each tripper pin represents a 15- or 30-minute slot. Push a tripper DOWN to switch the socket ON during that period; pull it OUT (or leave it raised) to keep it OFF. Mark your ON block first, then your OFF block. Double-check by scanning around the full 24-hour ring before plugging in.
Plug the Timer Into the Wall
Insert the timer's plug into a properly earthed outlet. Confirm the outlet is rated for the load. For circuits that feed switchgear panels, verify that the upstream circuit breaker amperage matches the intended load.
Plug Your Appliance Into the Timer
Connect the device to the timer's output socket. Switch the appliance's own power switch to ON (if it has one) so it responds to the timer automatically rather than requiring manual activation each cycle.
Test with the Override Slide
Most mechanical timers have a three-position manual override: AUTO (follows schedule), ON (forces socket live), OFF (forces socket dead). Slide to ON momentarily to confirm the appliance powers up, then return to AUTO.
Programming a Digital LCD Timer Plug: Detailed Walkthrough
Digital timers add precision and multi-program capability. The button layout varies by brand, but the logic is consistent across almost every model on the market.
Setting the Clock
Press and hold CLOCK (or SET) for 2–3 seconds until the hours digit blinks. Use + and − to set hours, then press CLOCK again to advance to minutes, set them, and confirm. Always verify AM/PM if your timer uses a 12-hour display — a PM error shifts all events by 12 hours.
Entering a Program
Press PROG (or TIMER) to enter programming mode. The display will show P1 or PROG 1. Press PROG again to reveal the ON time slot for Program 1. Set hours and minutes, confirm, then the display advances to the OFF time. Set it and confirm. Repeat for additional programs. Most units accept up to 20 programs arranged in pairs.
Day Selection
After entering times, choose which days apply: every day (1–7), weekdays only (1–5), weekends (6–7), or individual day selection. This feature is absent on basic mechanical timers but standard on digital ones — it is particularly useful for commercial settings where operating hours differ by day.
Countdown / Delay Mode
Many digital timers include a COUNTDOWN feature. Enter a duration (e.g., 2 hours 30 minutes) and the socket will stay ON for exactly that period regardless of the programmed schedule. Useful for slow cookers, battery chargers, or any task with a known run time.
| Price Range | Max Programs | Min Interval | Battery Backup |
|---|---|---|---|
| Under $10 | 8 | 1 min | Yes (CR2032) |
| $10–$25 | 16–20 | 1 min | Yes (CR2032) |
| $25–$60 | 20+ | 1 sec | Yes (rechargeable) |
| DIN-Rail Switchgear | Unlimited (weekly) | 1 min | Yes (supercapacitor) |
Setting Up a Smart Wi-Fi Timer Plug
Smart timer plugs add remote access and integration with home or building automation. Setup is slightly more involved but the ongoing flexibility justifies the extra steps for most users.
Download the App and Create an Account
Most Wi-Fi timers use the manufacturer's own app (e.g., Tuya Smart, Kasa, or TP-Link). Install it, create an account, and keep your phone on the 2.4 GHz Wi-Fi band during pairing — 5 GHz networks are not supported by the majority of devices as of 2025.
Pairing Mode
Plug in the device and press the button for 5 seconds until the LED flashes rapidly. In the app, select "Add Device" and follow the on-screen pairing wizard. The process typically takes under 90 seconds on a strong signal. If it fails, move the plug closer to the router, confirm 2.4 GHz, and retry.
Creating Schedules
Inside the app, tap Schedule or Automation, then tap the + icon. Set the trigger time, select the days of the week, choose ON or OFF as the action, and save. Repeat for as many events as needed — most apps impose no practical limit on the number of schedules per device.
Sunrise / Sunset Automation
Enable location services so the app can calculate local sunrise and sunset. Schedule outdoor lights or blinds to activate relative to these times (e.g., "Turn ON 15 minutes before sunset"). This eliminates the need to adjust schedules seasonally.
Energy Monitoring
Higher-end smart timer plugs report live wattage, daily and monthly kWh consumption, and estimated cost. According to data published by ENERGY STAR (2024), households that actively review appliance-level consumption reports reduce standby energy waste by an average of 10–15%.
Timer Power Plugs in Switchgear Panels and Distribution Boards
In commercial buildings, factories, and large residential installations, time-based switching happens inside the switchgear enclosure rather than at the individual outlet level. Understanding this relationship helps you choose where to install control — at the plug level or at the panel level.
What Is Switchgear?
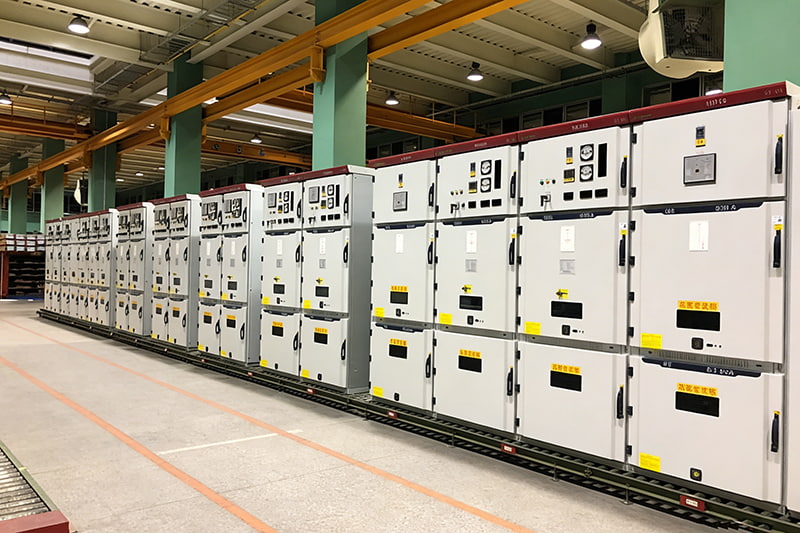
Switchgear is the collective term for equipment that controls, protects, and isolates electrical circuits — circuit breakers, disconnect switches, fuses, contactors, and associated busbars — typically housed in a metal enclosure. In buildings, the main distribution board is itself a form of low-voltage switchgear. Timer relays installed on the DIN rail inside that board perform the same function as a plug-in timer but for entire circuits rather than individual sockets.
DIN-Rail Timer Relays Inside Switchgear
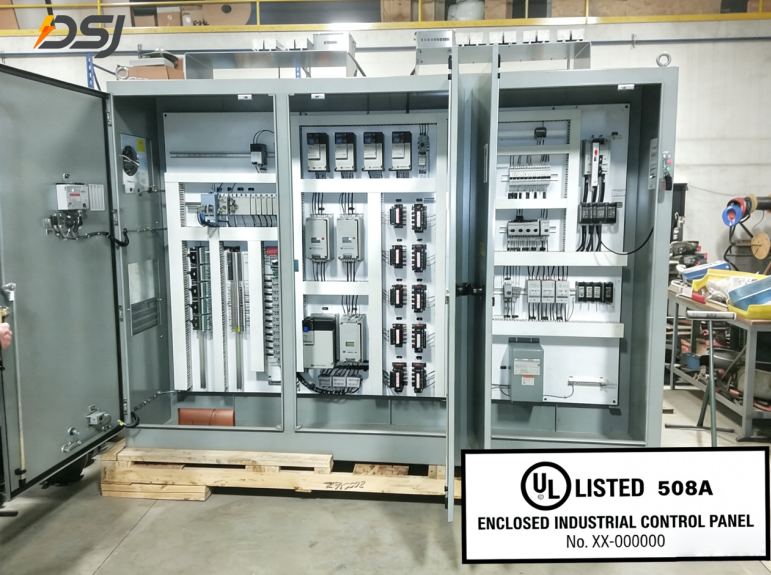
A DIN-rail timer module clips onto the 35 mm rail inside the switchgear cabinet and is wired in series with a contactor or MCB. The timer's output contact closes or opens on schedule, energising or de-energising the contactor coil. This arrangement controls lighting circuits, pumps, HVAC units, and industrial equipment at currents far beyond what any plug-in timer can handle — common ratings run from 16 A up to 630 A through the contactor.
Plug-In Timer at the Sub-Circuit Level
When a circuit feeds a single workstation, a server rack, or a piece of lab equipment, a plug-in digital or smart timer at the outlet provides granular control without touching the switchgear panel. This is the preferred approach for tenant fit-outs where access to the main switchgear cabinet is restricted or managed by the building owner.
Selecting Control Level
Use a DIN-rail timer inside switchgear when the load exceeds 16 A, when multiple circuits must switch simultaneously, or when the timer must integrate with the building management system (BMS). Use a plug-in timer when controlling a single appliance under 16 A at a socket outlet, especially in domestic or light commercial environments.
Modern switchgear from manufacturers such as Schneider Electric, ABB, and Siemens integrates programmable logic relays (PLRs) directly into the panel. According to ABB's 2023 product documentation, their CR-P range of DIN-rail time relays supports up to 255 program channels, weekly scheduling, and communication via Modbus RTU — capabilities that far exceed any plug-in timer but operate on identical scheduling principles.
How Timer Power Plugs Cut Energy Bills: Real Numbers
The primary reason most homes and businesses install timer plugs is energy saving. The impact depends on what appliance is controlled and how many hours per day it previously ran unnecessarily.
Appliances That Benefit Most from Timer Control
- Electric water heaters and immersion elements: heat during off-peak rate windows (typically 11 pm–7 am in many tariff structures).
- Garden and pond pumps: run for short daily cycles rather than continuously.
- EV chargers: charge overnight at cheaper rates, timed to complete before morning departure.
- Aquarium heaters and lights: maintain precise photoperiods for fish and coral health.
- Office equipment (monitors, printers, desk fans): auto-off at close of business, auto-on before staff arrival.
- Grow-light rigs: enforce strict dark/light cycles for plant cultivation.
- Commercial refrigeration pre-cooling cycles: in conjunction with switchgear contactors, precool before peak trading hours.
Off-Peak Tariff Strategy
In markets with time-of-use (TOU) electricity tariffs — increasingly common in the UK, Australia, and parts of the US following smart meter rollouts — a timer plug directly arbitrages cheap overnight rates. The UK Octopus Energy "Agile" tariff, for example, prices electricity as low as 1–3p/kWh between 2–5 am versus 28–35p/kWh at peak evening hours (2024 rates). A 3 kW water heater running for 2 hours in the cheap window instead of the peak window saves roughly £0.60–£0.64 per day, or around £220 per year at those rate differentials.
Safety Rules for Timer Power Plugs
A timer plug is a switching device handling mains voltage. These rules are non-negotiable.
Never Exceed the Rated Load
Every timer plug has a maximum current and wattage printed on its body. Exceeding this rating causes overheating, contact welding, and potential fire. For inductive loads (motors, transformers), use a timer rated at least 20% above the appliance's running current to account for inrush.
Do Not Daisy-Chain Timers or Extension Leads
Plugging a high-current extension board into a timer plug multiplies the load risk. The timer was designed to control one defined load, not to act as a distribution point for multiple appliances. Each load that needs timer control should have its own dedicated timer or be controlled through the switchgear panel.
Keep Timers Away from Moisture
Standard plug-in timers carry an IP20 or lower ingress protection rating — they are not sealed against water. For outdoor or bathroom use, choose a timer with at least IP44 rating and house it in an appropriately rated enclosure. Switchgear enclosures used outdoors are typically specified at IP55 or higher.
Check Compatibility with Dimmer and Variable-Speed Loads
Timer plugs use relay contacts, not phase-cutting dimmers. Dimmer-switch circuits and some variable-speed drives are incompatible with timer relay outputs. Always consult the appliance's manual before using a timer with it.
Earthed Outlets Only
Timer plugs must only be inserted into properly earthed (grounded) outlets. Using one in a two-pin ungrounded outlet increases shock risk and may void product warranties. If your switchgear distribution board lacks proper earth continuity, address that before adding any timer devices.
Replace Batteries in Digital Timers Annually
A flat backup battery means the clock resets to midnight after any power interruption. Replace the CR2032 cell every 12 months as standard maintenance, even if the timer appears to function normally. Many commercial facilities add this to their annual switchgear and distribution board maintenance checklist.
Application Guide: Which Timer Type for Which Job
The table below maps common use cases to the most appropriate timer type, helping you make a faster decision.
| Application | Recommended Timer | Why | Typical Load |
|---|---|---|---|
| Bedside lamp | Mechanical rotary | Simple, cheap, no setup | Under 60 W |
| Aquarium heater + lights | Digital LCD | Multiple programs, 1-min precision | 100–300 W |
| EV overnight charging | Smart Wi-Fi or dedicated EVSE timer | Remote override, tariff integration | 3.7–7.4 kW |
| Office block lighting | DIN-rail timer relay in switchgear | High current, BMS integration | 10–100 A via contactor |
| Garden irrigation pump | Digital LCD (outdoor IP44) | Sealed, daily repeat, 15-min slots | 200–750 W |
| HVAC pre-cooling | DIN-rail timer in switchgear | High current, safety interlocks | 15–80 A |
| Grow lights (indoor farming) | Digital LCD or smart plug | Exact photoperiod, repeatable daily | 400–1,200 W |
Troubleshooting Common Timer Power Plug Problems
Even well-installed timer plugs occasionally misbehave. The following covers the most frequent issues encountered in both domestic and light commercial switchgear environments.
Cause: Clock reference is incorrect. Common after a power cut (mechanical timer has no backup). Also check AM/PM error on 12-hour digital displays.
Fix: Re-align the dial to current time, or reset the digital clock. Mechanical timers should be re-checked after every power interruption. Digital units with a charged CR2032 battery will retain settings through outages up to several years.
Cause: Override switch is set to OFF position, or the trippers/program are not correctly set around the current time window.
Fix: Move override to AUTO. Visually scan all trippers. On digital models, press the manual ON/OFF button once to confirm it has not been manually overridden — a single press typically locks the socket on or off until the next programmed event.
Cause: Load is at or above the timer's rated maximum, or the timer is in a confined space with no ventilation.
Fix: Measure the actual current draw of the connected appliance with a clamp meter. If it exceeds 80% of the timer's rating, upgrade to a higher-rated timer or move control to a DIN-rail contactor and timer inside the switchgear panel.
Cause: Weak signal, router band steering pushing the device to 5 GHz, or IP address conflicts on the network.
Fix: Move the router closer or add a Wi-Fi repeater. Assign the smart plug a static IP in the router's DHCP settings. Disable band steering on the router so the 2.4 GHz network has a separate SSID that the plug can lock onto reliably.
Cause: Depleted backup battery, firmware issue (smart timers), or transient voltage spike from switchgear switching operations nearby.
Fix: Replace the CR2032 battery. For smart plugs, check for a firmware update in the app. If spikes from switchgear are suspected, add a plug-in surge protector upstream of the timer.
Cause: Appliance's own power switch is in the OFF position, so even when the timer energises the socket, the appliance receives power but does not turn on.
Fix: Set the appliance's own switch to ON. This is the most common oversight when installing timers on televisions, microwaves, and desktop computers — devices with soft-power or hard-power switches both need this check.
Advanced Uses: Integrating Timer Plugs with Switchgear and Building Automation
Beyond simple domestic scheduling, timer plugs and their switchgear equivalents play an important role in commercial energy management. Here is how the integration works in practice.
Load Shedding During Peak Demand
Commercial electricity contracts often include demand charges based on the highest 15- or 30-minute average power consumption in a billing period. A coordinated timer strategy — using DIN-rail timers in the main switchgear to stagger startup times for large loads like chillers, compressors, and EV chargers — can flatten the demand curve and reduce these charges significantly. According to a case study published by the Carbon Trust (UK, 2022), a medium-sized warehouse reduced its peak demand charge by 18% purely by programming staggered start times into its switchgear timer relays.
Astronomical Clocks and Latitude-Aware Switching
Higher-specification DIN-rail timer modules inside switchgear include an astronomical clock function. Once the installation latitude, longitude, and time zone are programmed, the timer calculates sunrise and sunset for every day of the year internally. Outdoor lighting circuits, car park columns, and facade lights switch precisely with natural daylight without any seasonal manual adjustment. The same principle is available in smart plug apps through GPS-based sunset/sunrise scheduling.
Integration with BMS via Modbus and KNX
Industrial-grade timer relays inside switchgear cabinets increasingly communicate over Modbus RTU, Modbus TCP/IP, or KNX. This allows the building management system to override or adjust timer schedules remotely — for example, extending operating hours during a late event without physically accessing the switchgear cabinet. Plug-in smart timers achieve a similar result through cloud APIs, though without the hardened reliability of a wired BMS connection.
Combining Timers with Motion and Occupancy Sensors
A timer defines when a circuit is allowed to respond; an occupancy sensor defines whether anyone is present to need it. In combination — implemented either through smart home automation or through a logic relay in the switchgear panel — the circuit only activates if both conditions are met: the correct time window AND occupancy detected. This hybrid approach is increasingly common in office washrooms, stairwells, and car parks, and it consistently outperforms either timer-only or sensor-only control in energy studies (CIBSE Guide F, 2023 edition).
Maintenance Schedule for Timer Power Plugs
Timers are low-maintenance devices, but periodic checks ensure they continue operating safely and accurately. The following schedule applies to both domestic plug-in timers and commercial switchgear-mounted timer relays.
| Task | Frequency | Applies To |
|---|---|---|
| Verify clock accuracy against phone or GPS time | Monthly | All types |
| Replace backup battery (CR2032) | Annually | Digital LCD timers |
| Check all tripper pins are fully seated | Every 6 months | Mechanical rotary timers |
| Inspect plug pins and socket for discolouration or pitting | Annually | All plug-in timers |
| Torque-check DIN-rail terminal screws | Annually (or per switchgear maintenance schedule) | Switchgear-mounted relays |
| Update firmware | When update is available | Smart Wi-Fi timers |
| Review and update schedule for seasonal daylight changes | Twice yearly (unless astronomical timer is used) | All types except astronomical |
Buying Guide: What to Look for in a Timer Power Plug
With hundreds of models available, focus on these specification points to avoid purchasing the wrong device.
Match or exceed the appliance's rated current. A 10 A timer is suitable for most lamps and small appliances. Go to 16 A for heaters, washing machines, and dishwashers. Anything above 16 A belongs in the switchgear panel on a DIN-rail contactor/timer combination.
For simple lamp control, 2 programs per day is sufficient. For aquariums, grow tents, or office equipment with complex schedules, choose a timer with at least 16 programs or an unlimited smart schedule.
Mechanical timers resolve to 15 or 30 minutes. Digital timers resolve to 1 minute. Some high-end digital and smart timers offer 1-second resolution for industrial pulse applications.
For indoor use, IP20 is standard. For garages, sheds, and outdoor sheltered positions, choose IP44. For fully exposed outdoor installation, IP55 or higher. Switchgear enclosures have their own IP rating that must match the installation environment.
Check whether the timer's relay is rated for resistive loads only or also for inductive and capacitive loads. Inductive loads (motors, transformers, fluorescent ballasts) require a de-rating or a timer specifically rated for inductive use.
Confirm 2.4 GHz Wi-Fi compatibility. Check whether the product uses a proprietary cloud server — if the manufacturer discontinues the service, the smart features stop working. Open-platform timers compatible with Home Assistant or Matter offer longer-term independence.
Frequently Asked Questions
For exclusive deals and latest offers, sign up by entering your email address below.



 +86 18513032986
 FLC Center, Chaoyang District, Beijing, China
Copyright © DSJ Electrical Co., Ltd. All Rights Reserved
Power Distribution Equipment & System Manufacturer